
If you’re on Instagram, then you know that Reels are a fantastic way to gain followers. The short videos are entertaining and eye-catching, which often results in high engagement for brands.
In this guide, we’ll explore how to expand your social media reach by utilizing Instagram Reels. You’ll learn key strategies, from creating a reel to post timing.
Table of contents
What are Instagram Reels?
To put it simply, Instagram Reels are vertical videos and can last up to 90 seconds in length. With Reels, you can incorporate numerous video clips, filters, captions, interactive backgrounds, sounds, and more.
Reels are not the same as Instagram Stories. While stories disappear after 24 hours, Reels stay up for as long as you want. You can post them in just the Reels tab as well as feature them on your feed. You can also delete them at any point.
The great part is that the Instagram algorithm loves Reels. Which this means there’s a bigger chance for people who don’t follow you to see your reel, then if you were just posting on your feed. This is excellent news for social media marketers.
Users can also find Reels on the Instagram app’s dedicated section. The Reels icon at the bottom of the Instagram app’s home page leads to a scrollable feed full of popular Reels.
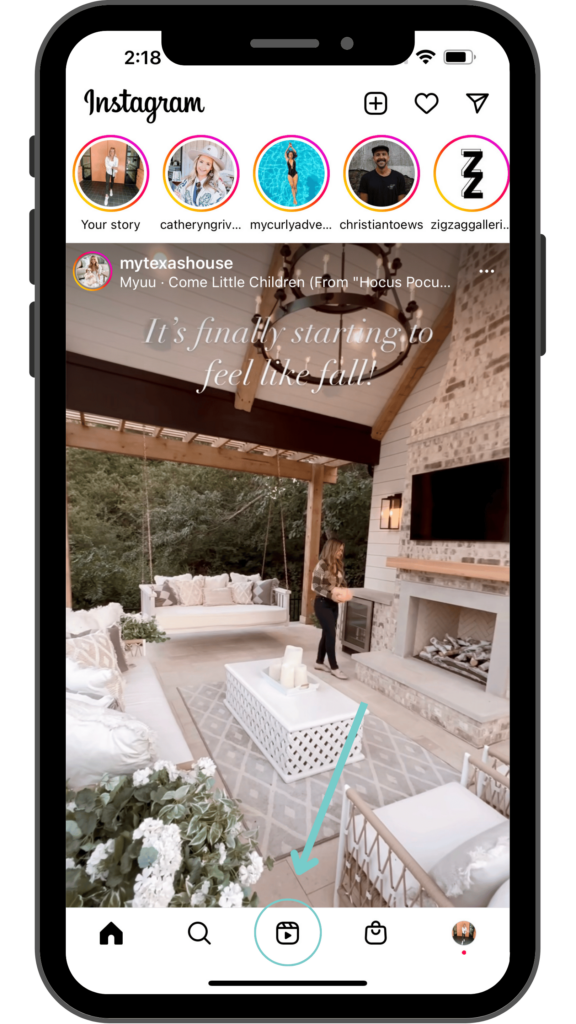
The user’s Reels may be found in a dedicated tab above the account’s Feed.
How to make a Reel on Instagram in 5 steps
If you use Instagram or TikTok, you’ll have no trouble creating Reels.
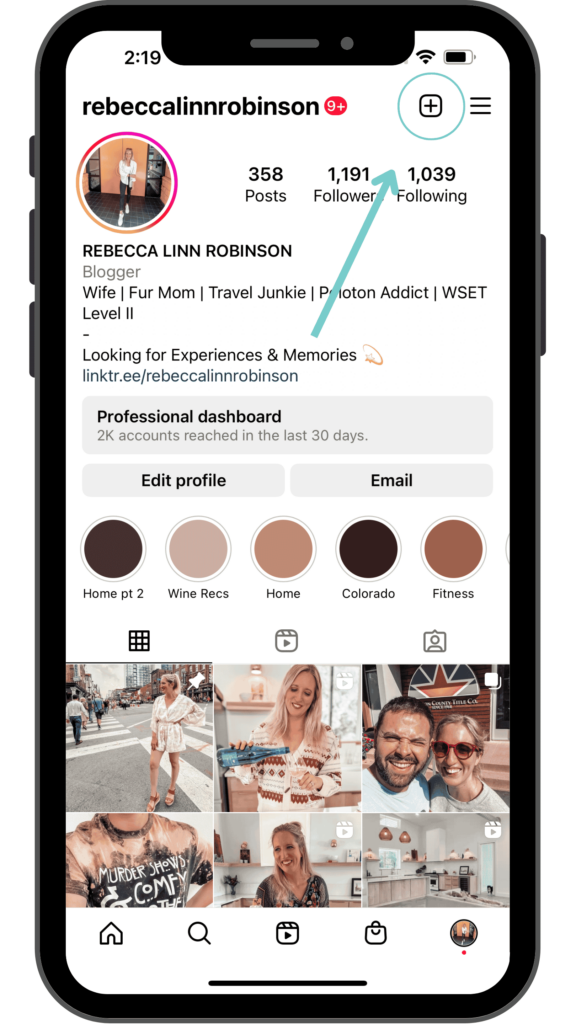
Step 1: Tap the plus icon at the top of the page and select Reel
Simply open the Instagram app and go to your profile page to get to Reels. Click the plus sign at the top right and select “Reel”.
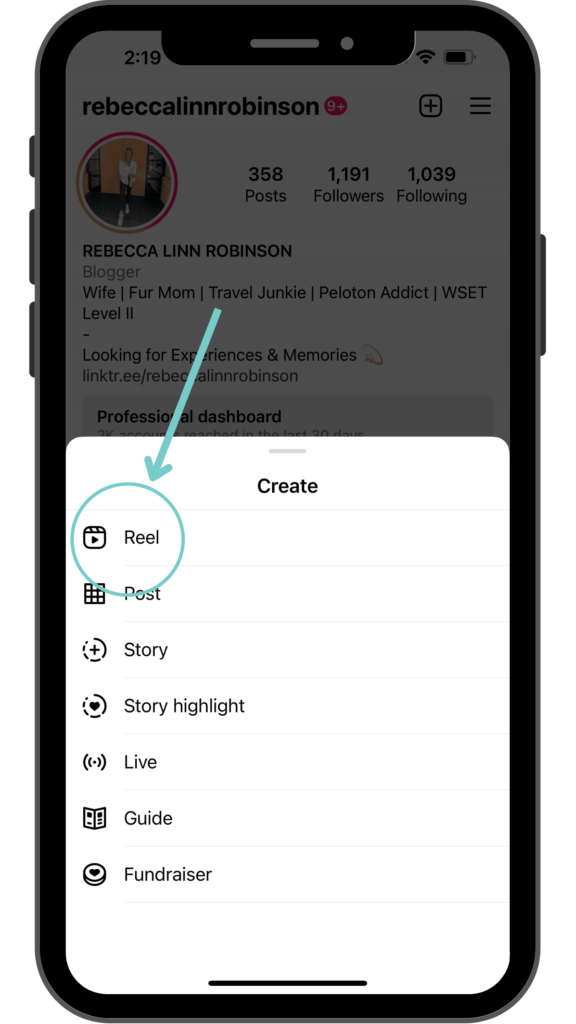
You can also find the Reels by swiping left to the Instagram camera and selecting Reel from the options at the bottom.
Step 2: Record or upload your video clip
With Instagram Reels, you have two options for creating content:
- Press and hold the record button to capture footage in real time.
- Upload previously recorded video footage/clips from your camera roll.
You have the option of recording your reel in a series of clips or all at once.
There’s a countdown before the hands-free recording begins. You can tap the record button to end a clip, then tap it again to begin a new clip throughout the recording.
Next, the Align button should appear. After recording your next clip, you may use this option to line up objects from the previous one before pressing Record. This permits you to make smooth transitions from one shot to the next in a reel such as when changing clothes, adding new music, or adding new friends.
To change or get rid of the clip you just recorded, tap Edit Clips.
Step 3: Edit your Reel
After you’re done recording, use the icons at the top of the editor to add stickers, drawings, and text to your Reel.
The Reels editor has built-in creative features, allowing you to perform all of your editing from one location.
The features are as follows:
- Audio: You can select audio from the Instagram music library, import it from your device, or add your favorite part only.
- Length: Video length can be easily modified to better suit your needs- 15, 30, 60, or 90 seconds.
- Speed: You can speed up or slow down your video using this option. Choose .3x, .5x, or 2x to slow it down; pick 3x, 4x, or 5x to speed it up.
- Layout: You can add more than one recording to the frame by editing the layout and adding extra recordings.
- Timer: The timer function on the app is useful for recording hands-free video footage without having to constantly monitor the time.
- Dual: You can now record videos using both your front and rear cameras at the same time.
- Align: After you’ve recorded your first clip, the trimmer appears. It allows you to link previous clips by aligning them side-by-side.
Once your clips have been aligned, you may add popular sounds or music by tapping the music note symbol, or record a voiceover.
By tapping the download icon, you can save Instagram Reels to your device for later.
Step 4: Adjust your Reel’s settings
Once your reel is ready to go, tap “Next” located in the bottom right corner of your screen. From there you can:
- Edit your Reel cover by either choosing a frame from the video or uploading an image from your cameral roll.
- Add a caption.
- Tag people and/or products in your Reel.
- Invite a collaborator.
- Add a location.
- Allow Facebook recommendations. By doing this, your Reel will be sent to Facebook users who are likely to engage with your content.
- Rename your audio. If you use original audio, like a voiceover, you can name it so other users can use the audio later.
- Enable or disable auto generated captions.
- Decide if you want your Reel posted to your Instagram Feed or just to the Reels tab.
Step 5: Post your Reel
When you’re ready, tap the Share button at the bottom of your screen. Congratulations- you have now posted your first Reel! But we’re not done yet. There are still some tactics we can use to make this format work even better for your brand.
5 tips for making viral Reels as a business
IG Reels can be a powerful tool for getting your business in front of the right people. It might also help you gain more followers and boost engagement. However, this does not happen on its own. To go viral on Instagram Reels, you must know the secrets.
1. Know how the Instagram Reels algorithm works
The algorithm is what determines which Reels Instagram shows to which people. Understanding how it works can help you get more engagement and views.
A few things you can do to get noticed by the algorithm are add trending sounds, use the right hashtags, and make your reels visually interesting.
2. Have fun with trending audio
If you’ve ever scrolled through Instagram Reels or TikTok, you’ve probably noticed the same sounds being used over and over again. That’s not an accident.
Sounds for IG Reels are song/audio clips from other creators’ videos. As they become more popular, you can use them in your reels and get more engagement because users often search by sounds.
Keep up with the trends by using Instagram and taking note of which sounds you see appearing more frequently.
Next time you’re scrolling through Reels, if you hear a sound that you like and it has an arrow next to the name, save it. The arrow means that it’s a trending sound.
3. Don’t be too salesy
Keep in mind that users don’t typically utilize social media expecting to see ads. Instead, they use platforms like Instagram to explore new concepts, connect with friends, and for a quick dose of entertainment between activities. Therefore, your Reels should reflect those goals.
Create material that your target audience will find entertaining. Whether that’s creating a popular dance or making fast how-to Reels, the goal is to delight, educate, and amuse people rather than sell to them.
That isn’t to say you shouldn’t use your Reels as advertisements. To get even more attention, boost your best performing Reels.
4. Post consistently and don’t give up
The same techniques for success on Instagram Stories or in the normal Feed may be carried over to Reels. One of the most important things you can do to improve your performance across all platforms, including Reels, is to consistently publish material.
The Instagram algorithm is designed to push new content to the top of people’s feeds, so posting videos on a regular basis increases your chance of going viral because it keeps your content fresh.
If you post frequently, you’ll quickly gather a wealth of useful insights to guide your decision-making about what content works and why. The more you post, the better you’ll get to know your target audience—what they like, when they’re most active online, and so on.
5. Collab with other creators
Instagram recently introduced a new feature called Collabs, which was rolled out last year. This option allows you to collaborate with another person and have them share your Reel from their profile as though it were their own.
The Collab feature is immensely valuable if you frequently collaborate with influencers, brand partners, and others. By allowing you to share content with their entire following, it has the potential to result in increased likes, shares, reach, and engagement.
Here’s how it works:
- When you’re ready to publish your Reel, select Tag people.
- Tap Invite collaborator.
- Choose the user who you are collaborating with on the video.
After the user accepts your invitation to collaborate, the reel will be visible on their account under the Reels tab.
Instagram Reels cheat sheet
With so many questions about Reels, we’ve compiled a cheat sheet with all the answers you need. Quickly skim it now and bookmark it for later reference.
How to schedule Instagram Reels
Automating your social media posts is key to maintaining a constant online presence without putting in extra hours. Thankfully, with apps like Hootsuite and Later, you can easily schedule out all of your content, including Reels.
If you don’t use an app, you can always save your Reel as a draft within the Instagram app and go back and manually publish.
How to download Instagram Reels
Being able to download Instagram Reels on your phone can be beneficial as both a creator and consumer.
As a creator, it allows you to save drafts to your phone or share them with others before you post them. Downloading Reels is also great because you can share them across multiple platforms.
Downloading videos not only allows you to keep them permanently, but also access them offline.
There are a few ways you can go about downloading Reels.
While you are editing the Reel, you can download it from the Reels editing page. After it’s gone live, you can download it by clicking on the three dots in the bottom right corner and click “Save to Camera Roll.”
If you want to download someone else’s Reel, it’s best to use a third party platform.
The best time to post Reels on Instagram
By understanding when your users are most active, you can use that information to maximize the reach and engagement of your brand. Timing is everything when it comes to social media, so make sure you’re ahead of the game!
The bottom line is that every person’s optimal posting time is different. Your followers may be active later, earlier, or scroll more on weekends.
By using third party apps like, Later or Hootsuite, you can see when the optimal time to post is for your followers.

Instagram Reels dimensions
Having incorrect dimensions may result in your material looking, to be blunt, really awful. And that means your followers most likely won’t engage with it. Not to mention, the algorithm dislikes it when your Reels appear stretched or deformed.
So, what is the ideal size for an Instagram Reel? Your cover and frames should be sized at 1080×1920 pixels. If you also want your Reel to appear in your feed (which I highly suggest), make sure your thumbnail is sized at 1080×1080 pixels.
The ideal experience for users is to view Reels in full-screen, which means a 9:16 ratio. However, Instagram also displays Reels in the main feed, cropped to a 4:5 ratio.
Keep in mind not to put any essential details on the outskirts of the frame, or they might get cropped out.
How long are Instagram Reels?
In the past, users were limited to just 15-second Reels when Instagram added the feature in 2019. Now, users can post Reels of up to 90 seconds each.
Is it necessary to use all 90 seconds? Not always. It entirely depends on the Reel. When it comes to determining how long to make an Instagram reel, aim for simplicity. Longer Instagram Reels are great for things like how-to guides, travel information, etc.
That being said, you don’t want to make things drag on. Keep in mind that the goal of a Reel is to create short videos that are fun and engaging.
How to search Reels on Instagram
If you want to create successful Instagram Reels, one of the best things you can do is take a look at what other creators are doing. You can find plenty of great content to serve as inspiration for your own creations within the app.
You can use the search bar at the top of the app to quickly find Reels. Just type in what you’re looking for, and start exploring content.
Although Instagram’s standard search function is helpful, it does not always show Reels. Let’s say you search “Vacation” – both reels and images will populate. Pick a reel, click on a hashtag in the caption, and that will take you to all content using that hashtag. From there, you can filter by “Top”, “Recent”, or “Reels”.
Now you are ready to start creating and posting Reel content!
Excellent Video if You Want to Blow Up Your Reels
Looking for more ways to improve your Instagram check out 5 Ways to Improve Your Instagram Bio